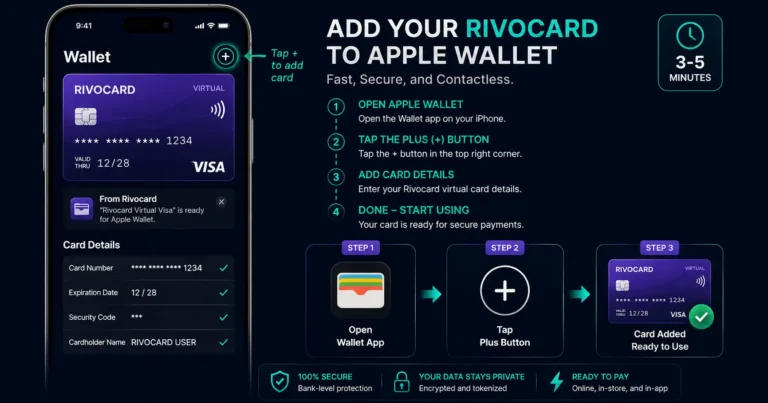
Quick answer: To add your Rivocard virtual Visa card to Apple Wallet: open the Wallet app on your iPhone, tap the + button, select ‘Debit or Credit Card’, enter your Rivocard card number, expiry date, and CVV from your Rivocard dashboard, and complete the verification step (typically an email code sent to your Rivocard account). The card is active in Apple Pay within 3-5 minutes. Use it by double-clicking the side button (Face ID iPhones) or home button (Touch ID iPhones), authenticating, and tapping your phone to any NFC terminal. 0% purchase fee applies — the same as direct card entry.
Before You Start: What You Need
- An iPhone. Apple Wallet requires an iPhone 6 or later. Apple Watch (Series 1 or later) can also hold a card once added to iPhone.
- Rivocard virtual card. A card that is active and funded (not frozen, not deleted, with balance).
- Your card details. Your 16-digit card number, expiry date (MM/YY), and 3-digit CVV. All visible in your Rivocard dashboard.
- iOS updated. Not strictly required but recommended for the best Wallet experience.
- Your Rivocard email accessible. The verification step typically sends a code to your Rivocard account email.
Your Rivocard card details are in your dashboard: Log into rivocard.com, navigate to the Cards section, and select the card you want to add. The full card number, expiry date, and CVV are displayed there. Copy carefully — do not type from memory.
Step-by-Step: Adding Your Rivocard to Apple Wallet
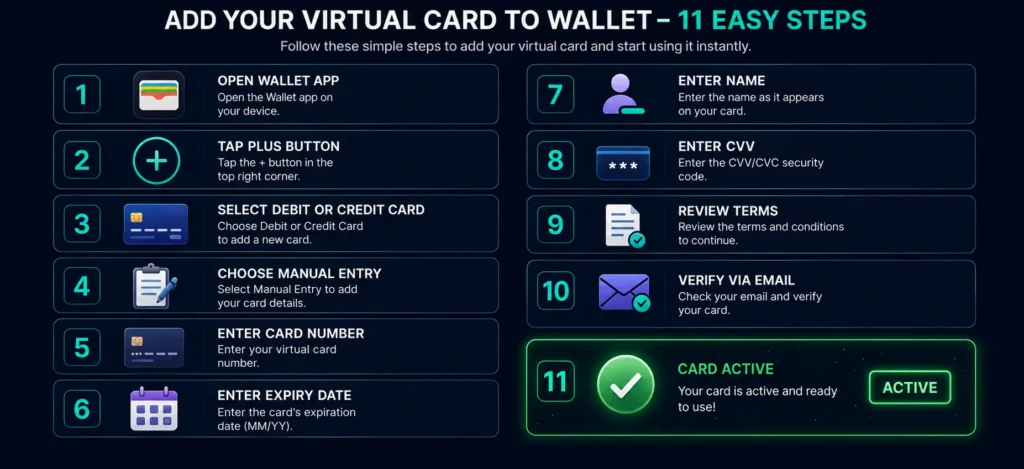
Step 1: Open the Wallet app. The Wallet app comes pre-installed on every iPhone. Find it on your home screen or in your app library. The icon looks like a wallet with colored cards inside.
Step 2: Tap the “+” button. The plus icon is in the top-right corner of the Wallet app screen. If you already have cards in Wallet, scroll to the bottom where the plus icon is visible.
Step 3: Select “Debit or Credit Card.” Apple Wallet will ask what type of card you are adding. Select “Debit or Credit Card” (not a transit card or other type).
Step 4: Choose entry method. Apple Wallet offers two ways to enter your card:
- Camera scan: Hold your card in front of the camera. For a virtual card, this does not apply (there is no physical card to photograph). Skip this and choose the manual entry option.
- Enter Card Details Manually: Tap this option.
Step 5: Enter your card number. Type your 16-digit Rivocard card number. You can copy it from your Rivocard dashboard to avoid typos. Ensure there are no spaces when entering.
Step 6: Enter expiry date. The month and year as shown in your Rivocard dashboard (format: MM/YY).
Step 7: Enter your name. Enter the name associated with your Rivocard account exactly as it appears in your account settings.
Step 8: Enter the CVV. Tap “Next” and enter your 3-digit CVV when prompted. This is the security code visible in your Rivocard dashboard.
Step 9: Review Rivocard terms. Apple Wallet will display terms from Rivocard. Read and tap “Agree.”
Step 10: Verify the card. This is the step where Rivocard confirms the card is being added by you. Apple Wallet will offer one or more verification methods. The most common for Rivocard is email — an email is sent to your Rivocard account email with a one-time code. Check your inbox, enter the code in Apple Wallet, and tap “Next.”
Step 11: Card is added. After successful verification, your Rivocard appears in Apple Wallet. The first card added becomes your default card automatically. Additional cards can be added and you can set any card as default.
Total time: 3-5 minutes from opening Wallet to card active.
How to Pay With Your Rivocard in Apple Pay
At in-person contactless terminals:
- Double-click the side button (iPhone X and later with Face ID) or double-click the home button (iPhone 8 and earlier with Touch ID)
- The Wallet app opens showing your default card
- Authenticate with Face ID or Touch ID
- Hold the top of your iPhone near the payment terminal’s contactless reader
- Wait for the payment confirmed haptic feedback and the checkmark on screen
Online in Safari: Look for the “Pay with Apple Pay” button at checkout. Tap it. Your default Rivocard card is shown. Authenticate with Face ID or Touch ID. Payment completes.
In apps: Tap the “Apple Pay” button within supporting apps. Confirm the amount and card, authenticate, done.
Switching cards: If Apple Wallet is open during payment, tap the displayed card to see other cards and select a different one before authenticating.
Apple Wallet Features That Work With Your Rivocard
Apple Watch: Once the card is added to your iPhone Wallet, you can add it to your Apple Watch in the Watch app. Tap your watch to pay at any NFC terminal without taking out your phone.
Express Transit: Some transit systems (London Overground, certain others) support Express Transit — you can tap your iPhone or Apple Watch to a transit reader without needing to unlock your device or authenticate. Whether Express Transit is available with Rivocard depends on the transit system’s Express Transit compatibility.
Transaction history: Apple Wallet shows recent transaction history for cards. Your Rivocard transactions via Apple Pay appear here alongside the transaction details from your Rivocard dashboard.
Notifications: Apple sends payment notifications after each Apple Pay transaction.
Card removal: To remove a card from Apple Wallet, navigate to the card in Wallet, scroll down, and tap “Remove This Card.” This does not delete or freeze your Rivocard account — it only removes the card from the Apple device.
Troubleshooting: Common Issues
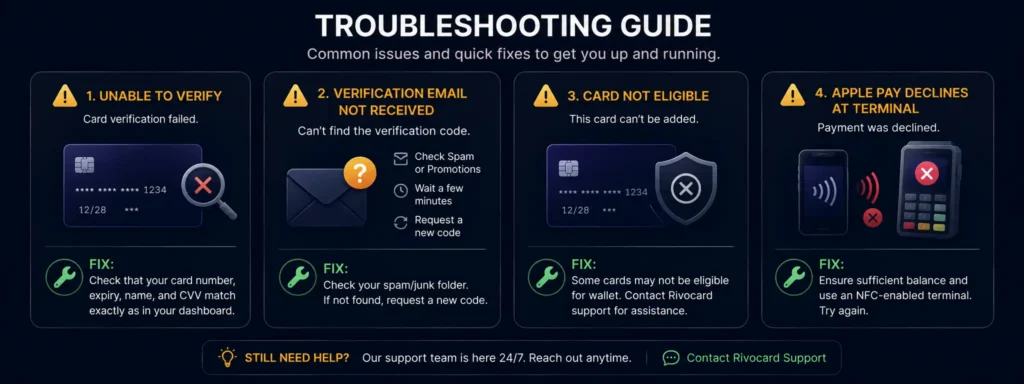
“Unable to verify card” error: Most commonly caused by entering incorrect card details. Double-check:
- Card number matches exactly what is in your Rivocard dashboard (16 digits, no spaces)
- Expiry date is correct (MM/YY format)
- CVV is the correct 3-digit code
- Your name matches exactly as in your Rivocard account
Also confirm the card is active (not frozen, not expired, balance is positive).
Verification email not received: Check your spam or junk folder first. If the verification email is not there: request a new code from the Apple Wallet verification screen, or contact Rivocard support to confirm the email address is correct on your account.
“Card not eligible” message: This can occur if the specific card type or BIN is not supported by Apple Pay in your region. Apple Pay availability depends on the issuing bank’s agreement with Apple. If this message appears with your Rivocard, contact Rivocard support to confirm Apple Pay provisioning availability for your account.
Card added but Apple Pay declines at terminal: First confirm the card has sufficient balance. Then confirm the terminal supports NFC contactless payments (not all terminals do, especially older models). Try a different NFC terminal to rule out a terminal-specific issue.
Face ID or Touch ID not working during payment: Ensure Face ID or Touch ID is set up on your iPhone (Settings, Face ID and Passcode). If biometrics fail repeatedly, enter your device passcode as a fallback authentication method during payment.
Card expired in Wallet: Virtual cards have an expiry date. If your Rivocard virtual card expires, Apple Wallet will show it as expired. Create a new Rivocard virtual card, and add the new card’s details to Apple Wallet. Remove the expired card.
Managing Multiple Rivocard Cards in Apple Wallet
You can add multiple Rivocard virtual cards to Apple Wallet (up to 12-16 cards depending on your iPhone model).
Setting default card: Open Wallet, press and hold the card you want as default, and drag it to the front position. The front card is your default Apple Pay card.
Per-purpose card selection: When Apple Pay opens, tap the displayed card to see all your cards and select a different one before authenticating. This allows per-purchase card selection without changing your default.
Practical multi-card setup:
- Everyday spending card: set as default
- Travel card: loaded with travel budget, switch to this when abroad
- Subscriptions card: available but not default (subscriptions charge directly, not via Apple Pay)
The Security Layer: How Apple Pay Protects Your Rivocard
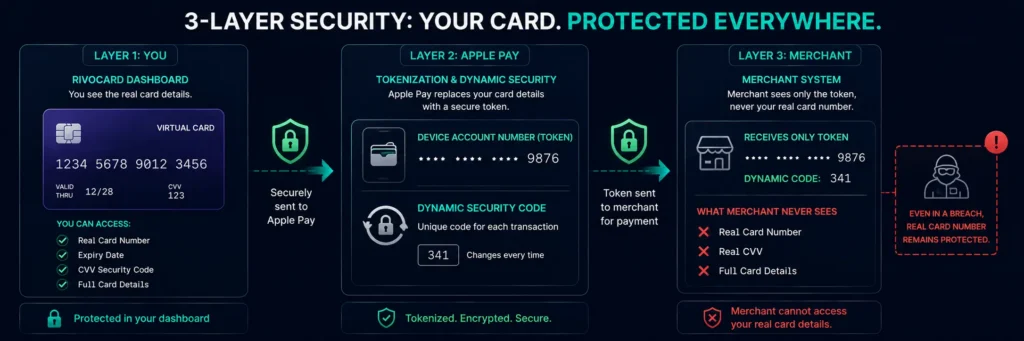
When you pay with Apple Pay using your Rivocard:
- Your actual 16-digit Rivocard card number is never transmitted to the merchant
- A device-specific token (Device Account Number) is used instead
- Each transaction also generates a unique dynamic security code
- If a merchant’s payment system is compromised, they have only an unusable token
- Your actual card number is protected even against merchant data breaches
Additionally:
- Face ID or Touch ID is required for every in-person Apple Pay transaction
- If your iPhone is stolen, the thief cannot use Apple Pay without biometric authentication
- You can remotely disable Apple Pay for your Rivocard by freezing the card in your Rivocard dashboard
FAQs
How do I add a Rivocard virtual card to Apple Wallet?
Open the Wallet app, tap the plus icon, select ‘Debit or Credit Card’, enter your card details manually (number, expiry, CVV from your Rivocard dashboard), enter your name, agree to terms, and complete email verification. The card is active in 3-5 minutes.
Where do I find my Rivocard card details for Apple Wallet?
Log into your Rivocard dashboard at rivocard.com, navigate to the Cards section, and select the card you want to add. Your 16-digit card number, expiry date (MM/YY), and 3-digit CVV are all displayed there.
How long does it take to add a Rivocard to Apple Wallet?
3-5 minutes total: entering card details (1-2 minutes), completing email verification (1-2 minutes), card confirmation (under 1 minute).
Can I add multiple Rivocard cards to Apple Wallet?
Yes. Apple Wallet supports up to 12-16 cards per device depending on iPhone model. Add as many Rivocard virtual cards as needed. Set your primary everyday card as the default and switch to others per transaction.
Does adding Rivocard to Apple Wallet change any fees?
No. Apple Pay transactions use your Rivocard card directly. The same 0% purchase fee and 0% FX fee apply to Apple Pay transactions as to direct card entry purchases.
What authentication is required to pay with Rivocard in Apple Pay?
Face ID (double-click side button, look at screen) on Face ID iPhones, or Touch ID (double-click home button, touch fingerprint sensor) on Touch ID iPhones. If biometrics fail, your device passcode is the fallback.
Can I add my Rivocard to Apple Watch?
Yes. Once the card is added to your iPhone Wallet, open the Watch app on your iPhone, go to Wallet and Apple Pay, and add the card to your Apple Watch. You can then tap your watch to pay at NFC terminals.
What should I do if Apple Wallet shows an ‘unable to verify’ error?
Check that your card details are entered exactly as shown in your Rivocard dashboard, your name matches your Rivocard account exactly, and the card is active and funded. If the issue persists, contact Rivocard support with details.
If I freeze my Rivocard card, does it stop Apple Pay too?
Yes. Freezing a Rivocard card blocks all charges at the network level – including Apple Pay transactions using that card’s token. Apple Pay shows the card but attempts to pay with it will be declined. Unfreeze in your Rivocard dashboard to re-enable.
Does removing a card from Apple Wallet affect my Rivocard account?
No. Removing a card from Apple Wallet only removes it from that specific device. Your Rivocard account, card credentials, and balance are unaffected. You can re-add the same card to Apple Wallet at any time.
Get Started
Create a Rivocard account and add your card to Apple Wallet in under 10 minutes. Create your Rivocard account